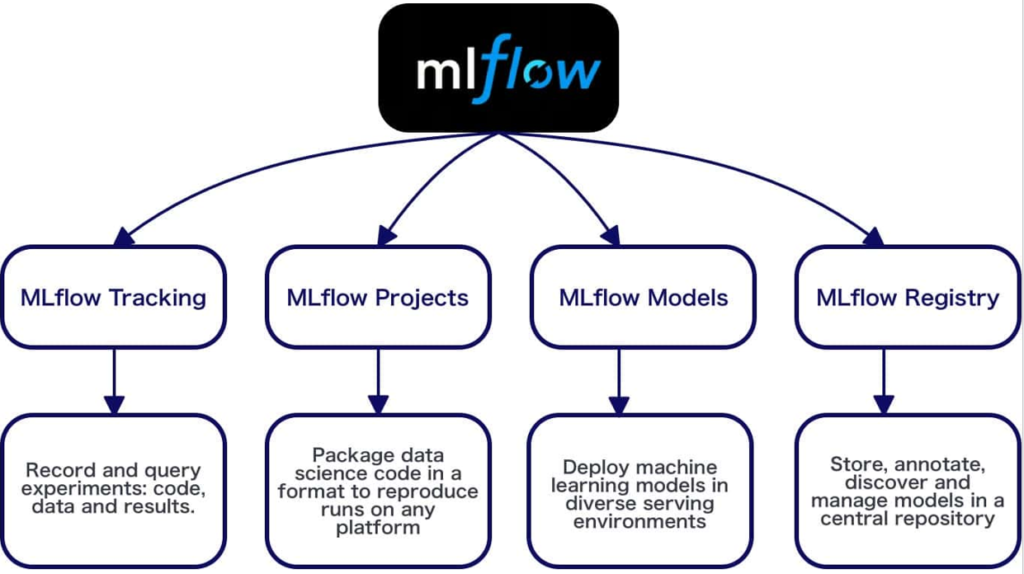
Here’s a short, simple introduction to each of the 4 core components of MLflow:
🚀 1. MLflow Tracking
- What it does: Logs and tracks your ML experiments.
- Benefit: Easily compare different runs, parameters, metrics, and artifacts.
📦 2. MLflow Projects
- What it does: Provides a standardized way to package and run ML code.
- Benefit: Ensures reproducibility and simplifies running code across environments.
📌 3. MLflow Models
- What it does: Standardizes packaging and deploying trained models across ML frameworks.
- Benefit: Easily deploy, load, and reuse models anywhere.
📚 4. MLflow Model Registry
- What it does: Centralized hub for managing and versioning ML models.
- Benefit: Clearly manage model lifecycle stages, simplifying collaboration and deployment.
Together, these components simplify managing the entire machine learning lifecycle.
MLflow Tracking (Simplified Explanation)
MLflow Tracking is a component of MLflow designed specifically to help you keep a clear record of your machine learning experiments.
🔍 What exactly is MLflow Tracking?
When you develop ML models, you often:
- Run multiple experiments with different parameters, data, or algorithms.
- Need to remember how each experiment performed.
- Want an easy way to compare results later.
MLflow Tracking does exactly that. It automatically records important details about each experiment, including:
- Parameters (e.g., hyperparameters, algorithm choices)
- Metrics (e.g., accuracy, precision, recall)
- Artifacts (e.g., trained models, plots, reports)
- Environment information (e.g., Python version, libraries)
📌 How MLflow Tracking works:
1. Log Parameters:
- Stores hyperparameters or any configuration you used in experiments.
- Example:
mlflow.log_param("num_layers", 4)
2. Log Metrics:
- Captures model performance scores and metrics.
- Example:
mlflow.log_metric("accuracy", 0.95)
3. Log Artifacts:
- Saves physical files (models, plots, images, datasets, etc.).
- Example:
mlflow.log_artifact("model.pkl")
📊 MLflow Tracking UI (Dashboard):
MLflow provides an easy-to-use web-based user interface:
- Visualize all experiments in a structured way.
- Compare parameters and metrics across runs.
- Download or preview logged artifacts easily.
🚀 Benefits of using MLflow Tracking:
- Easy Experiment Management: Clearly see what worked and what didn’t.
- Improved Collaboration: Share your experiments and results easily with your team.
- Reproducibility: Quickly reproduce any past experiment with exact settings.
- Faster Iteration: Saves time by simplifying experiment comparisons and selection.
📌 Example scenario:
Imagine you’re training a model to classify emails as spam or not-spam. You try multiple experiments, varying parameters like learning rate, model depth, and epochs.
With MLflow Tracking:
- Each experiment’s settings and results are logged automatically.
- You can easily identify your best-performing experiment (highest accuracy).
- Reproduce that exact experiment easily in the future.
📝 Simple Python Example using MLflow Tracking:
import mlflow

# Start tracking experiment
with mlflow.start_run():
    mlflow.log_param("learning_rate", 0.01)
    mlflow.log_param("epochs", 100)

    # Train your model here
    accuracy = 0.92  # obtained after training

    mlflow.log_metric("accuracy", accuracy)

    # Save your trained model
    mlflow.log_artifact("trained_model.pkl")
This simple example clearly illustrates how MLflow Tracking can help you stay organized and focused.
🎯 In short:
MLflow Tracking simplifies how you manage, record, visualize, and reproduce your machine learning experiments, helping you build models better and faster.
📌 MLflow Projects (Simplified Explanation)
MLflow Projects are a component of MLflow that help you organize, share, and run your machine learning code consistently across different environments and systems.
🎯 What exactly is an MLflow Project?
An MLflow Project is essentially a standardized way of packaging your machine learning code. Think of it as creating a recipe that clearly defines:
- Code: The scripts or notebooks that you use to train and evaluate your models.
- Dependencies: Python libraries and other requirements to run your code.
- Execution Environment: Details on how and where your code should be run (e.g., locally, cloud, containers).
- Parameters: Input values that can be changed when running your code (like learning rate, dataset location).
🔧 Why use MLflow Projects?
Machine learning code often runs into problems like:
- “It works on my machine” (but not elsewhere).
- Dependency issues (Python versions, library conflicts).
- Reproducibility issues (difficulty repeating results exactly).
MLflow Projects solve these issues by providing a standardized format and easy execution method.
📦 Structure of an MLflow Project
A typical MLflow project contains:
my-ml-project/
├── MLproject           # Specifies project configuration
├── conda.yaml          # Defines dependencies (optional)
├── train.py            # Your training script
├── data/               # Data files (optional)
└── README.md           # Documentation (optional)
📄 Example: MLproject file
The MLproject file is the core. It describes how to run your project:
name: SpamClassifier

conda_env: conda.yaml

entry_points:
  main:
    command: "python train.py --learning_rate {learning_rate} --epochs {epochs}"
    parameters:
      learning_rate: {type: float, default: 0.01}
      epochs: {type: int, default: 100}
name: Identifies your project.conda_env: Points to your environment dependencies file.entry_points: Specifies the command and parameters needed to run your code.
🚀 Running MLflow Projects
Run a project easily using:
mlflow run ./my-ml-project -P learning_rate=0.005 -P epochs=50
MLflow automatically:
- Sets up the correct environment (installs libraries from
conda.yaml). - Runs your code with specified parameters.
🎁 Benefits of MLflow Projects
- Reproducibility: Easily recreate the exact conditions to run experiments.
- Portability: Run your ML code consistently across local machines, cloud platforms, or containers.
- Collaboration: Share your projects seamlessly with your team or community.
🌐 Common Usage Examples
- Packaging your ML experiments clearly.
- Running experiments repeatedly on different datasets.
- Deploying experiments easily to cloud environments (AWS, Azure, GCP).
- Creating consistent workflows for ML pipelines.
📌 In short:
MLflow Projects help you standardize, organize, and run your machine learning code consistently, solving reproducibility, dependency, and collaboration challenges commonly encountered in ML workflows.
📌 MLflow Models (Simplified Explanation)
MLflow Models is a key component in MLflow that helps you package, manage, deploy, and reuse your trained Machine Learning models in a standardized, platform-independent way.
🎯 What exactly is an MLflow Model?
An MLflow Model is a standardized format for packaging trained ML models, making it easy to:
- Save models created with different ML frameworks (TensorFlow, PyTorch, scikit-learn, XGBoost, etc.).
- Load and reuse models later without confusion.
- Deploy models to different environments (e.g., REST APIs, batch predictions, cloud platforms).
Think of MLflow Models as a universal container that clearly defines how your trained model can be loaded and used consistently.
📦 Structure of MLflow Models
An MLflow model typically looks like this:
mlruns/
└── 0/
    └── run_id/
        └── artifacts/
            └── model/
                ├── MLmodel            # MLflow metadata about the model
                ├── conda.yaml         # Dependencies required by the model
                └── model.pkl          # The actual serialized model file (example: sklearn)
MLmodel: Metadata file describing the model type and how to load it.conda.yaml: Specifies environment dependencies required by the model.model.pkl: The actual serialized model file itself.
🔖 The MLmodel file (Important)
This file provides metadata about the MLflow model:
artifact_path: model
flavors:
  sklearn:
    pickled_model: model.pkl
  python_function:
    loader_module: mlflow.sklearn
    python_version: 3.10.6
run_id: abc1234
flavors: Defines how MLflow can load your model. Each framework is considered a “flavor” (like sklearn, tensorflow, pytorch, etc.).- MLflow uses this metadata to load models uniformly across different ML libraries.
🚀 MLflow Model Flavors
MLflow supports a variety of ML libraries as flavors, including:
- Scikit-learn
- TensorFlow & Keras
- PyTorch
- XGBoost
- LightGBM
- CatBoost
- Spark MLlib
- Prophet
- ONNX
Each flavor allows you to load models consistently, even across different frameworks.
📌 How MLflow Models Help
- Unified Serving: Deploy your model using REST APIs or batch prediction pipelines seamlessly.
- Interoperability: Easily switch between ML frameworks, simplifying your workflow.
- Easy Deployment: Deploy models to cloud services (AWS SageMaker, Azure ML, Google Cloud Vertex AI) without extra hassle.
- Reproducibility: Clearly documents model dependencies and environment for reproducibility.
🧑💻 Simple Example: Save & Load MLflow Model (with sklearn)
import mlflow.sklearn
from sklearn.ensemble import RandomForestClassifier

# Train model
model = RandomForestClassifier()
model.fit(X_train, y_train)

# Save model using MLflow
mlflow.sklearn.save_model(model, "rf_model")

# Load model again later
loaded_model = mlflow.sklearn.load_model("rf_model")

# Make predictions easily
predictions = loaded_model.predict(X_test)
🌐 Deploying MLflow Models
MLflow Models can be easily deployed as REST APIs:
mlflow models serve -m rf_model -p 1234
Now, your model is accessible at:
http://localhost:1234/invocations
🎁 Benefits Summary
- Easy Packaging: Clearly packages models across different ML frameworks.
- Reusability: Easy reuse and deployment of trained models.
- Portability: Consistent loading and serving across diverse environments.
- Collaboration: Simplifies sharing models with teammates and deployment engineers.
📌 In short:
MLflow Models make it easy to package, reuse, and deploy trained machine learning models consistently, solving common ML challenges related to deployment, portability, and reuse.
MLflow Models and MLflow Projects
Let’s simplify clearly:
🔍 Simple difference:
- MLflow Projects:
- Standardize and package your ML code for running training, testing, and experiments.
- Think of it as a “recipe” for executing ML code consistently.
- MLflow Models:
- Standardize and package your trained ML models to make deploying and reusing easy.
- Think of it as “packaging your finished product” (trained model) for easy use.
🗂️ Detailed Comparison:
| Feature | MLflow Projects | MLflow Models |
|---|---|---|
| What it manages | Code (scripts, dependencies, parameters) | Trained Models (TensorFlow, PyTorch, Scikit-learn, etc.) |
| Main purpose | Ensure reproducibility of experiments | Ensure consistent deployment and reuse of trained models |
| Output | Results (metrics, artifacts, trained models) | Packaged trained model ready for deployment |
| Analogy | Recipe (Instructions to cook food) | Packaged meal (Ready-to-eat food) |
🎯 Real-life Example:
- MLflow Project:
You define a standardized set of instructions (scripts, dependencies) to run your ML training. - MLflow Model:
After training your model using the instructions above, you save and package the trained model to be easily deployed as an API.
🚀 In short:
- MLflow Project → Standardize ML code execution (running experiments).
- MLflow Model → Standardize trained model packaging (deploying models).
This clear distinction makes MLflow powerful and organized in managing the full lifecycle of ML projects.
📌 MLflow Model Registry (Simplified Explanation)
The MLflow Model Registry is a centralized place to store, organize, version, and manage your machine learning models within MLflow. It simplifies how you keep track of different models, their lifecycle stages, and how you deploy them.
🎯 What Exactly is MLflow Model Registry?
Think of MLflow Model Registry like a model management hub, which clearly helps you:
- Keep track of all models created during experiments.
- Version your models (similar to version control systems like Git).
- Define and manage lifecycle stages for models (e.g., staging, production, archived).
- Facilitate collaboration by allowing teams to easily find and reuse the best models.
📦 Main Components of MLflow Model Registry
The MLflow Model Registry provides the following key elements:
| Component | Explanation |
|---|---|
| Model Name | Identifies your registered model uniquely |
| Model Version | Automatic numbering (e.g., Version 1, 2, 3…) |
| Model Stages | Assign stages such as Staging, Production, Archived |
| Annotations | Comments and descriptions for clarity |
📌 Typical Workflow with MLflow Model Registry
Here’s how you’d typically use MLflow Model Registry in practice:
Step 1: Register the Model
- After training and evaluating, register the model in MLflow.
import mlflow

mlflow.register_model(
    model_uri="runs:/<run-id>/model",
    name="CustomerChurnClassifier"
)
Step 2: Versioning Models
- Each time you register, MLflow automatically increments the model version.
- Version 1, Version 2, etc.
Step 3: Transition Model Stages
- Move models between lifecycle stages (Staging → Production → Archived).
client = mlflow.tracking.MlflowClient()

# Promote model to production
client.transition_model_version_stage(
    name="CustomerChurnClassifier",
    version=3,
    stage="Production"
)
Step 4: Deploy and Serve the Model
- Easily deploy the registered model to serve predictions.
🚦 Lifecycle Stages in Model Registry
MLflow provides clear lifecycle management with predefined stages:
- ✅ None (default initial stage after registration)
- ✅ Staging (model under validation/testing)
- ✅ Production (model actively deployed for real-world use)
- ✅ Archived (older models no longer in active use)
This makes it easy to clearly see the status of your models at any time.
🚀 Benefits of MLflow Model Registry
- Centralized Management: One clear location for all your ML models.
- Simplified Versioning: Tracks all changes and versions automatically.
- Clear Deployment Stages: Clarifies the state of your models (e.g., production-ready, staging, deprecated).
- Improved Collaboration: Makes sharing and reusing models within a team straightforward.
- Easy Model Governance: Enables you to audit, track, and manage models efficiently, supporting compliance needs.
🌐 Example Scenario
Imagine you’re predicting customer churn. After training various models:
- You register your best-performing model as
CustomerChurnClassifier. - MLflow automatically assigns Version 1.
- You test Version 1 in the Staging environment.
- When you’re confident, promote Version 1 to Production.
- Later, when an improved model (Version 2) is created, Version 1 can be moved to Archived, and Version 2 promoted to Production.
📌 MLflow Model Registry UI
MLflow provides a user-friendly web interface:
- Clearly view models, versions, and stages.
- Easily transition models between stages.
- Add descriptions, documentation, and notes directly.
📝 Quick Python Example
import mlflow
from mlflow.tracking import MlflowClient

# Create MLflow client
client = MlflowClient()

# Register the model after training
model_uri = "runs:/<run-id>/model"
model_name = "CustomerChurnClassifier"
client.create_registered_model(model_name)

model_version = client.create_model_version(
    name=model_name,
    source=model_uri,
    run_id="<run-id>"
)

# Transition to Production
client.transition_model_version_stage(
    name=model_name,
    version=model_version.version,
    stage="Production"
)
📌 In Short:
The MLflow Model Registry provides a simple, clear, and efficient way to organize, manage, version, and deploy your ML models, making the entire ML lifecycle significantly easier to manage and collaborate on.